How to Build a Snow Lantern
Created | Updated Nov 22, 2010

A snow lantern can be either a Yukimi Gata1 or a lantern made from, indeed, snow. If you are lucky enough to live in a climate where you get snow in the winter, you might want to try building a snow lantern made from snowballs.
The Snow
The building material has to have the right consistency, which usually occurs when the temperature outdoors is around freezing point2.
To test the consistency, grab a fistful of snow and squeeze it together. If it forms a firm lump that does not fall apart if you poke at it, then the consistency is just right. Make two snowballs and push them together - if they stick to each other, the consistency is more than right, it's perfect!
A thick layer of snow on the ground is better than a thin one, since a thin layer means you will have to scrape up snow from very close to the ground. This will often result in grass and dead leaves being scraped up together with the snow, making the snow look dirty.
Equipment
This is what you need to construct a snow lantern:
Warm clothes
You will not be moving round a lot, just standing still while making snowballs, so make sure to dress warmly. This is especially important if you are a perfectionist bent on making snowballs that are perfectly round and of identical size.
An extra pair of mittens/gloves
The snow is likely to wet through the mittens/gloves that you are wearing, and might turn your fingers ice cold. Bring an extra pair of mittens/gloves, preferably kept inside your coat so that they are nice and warm when you change into them.
A tea candle3
You could also use an ordinary candle, but it would be more difficult to fit into the rather small opening, so a tea candle would be preferable.
A box of matches or a cigarette lighter
A newspaper, a piece of cardboard or something similar
This might come in handy when building the first few rows of snowballs, especially if you have difficulties squatting. Kneeling in the snow is not recommended, unless you like wet spots on the knees of your trousers (and cold knees).
The Building Process
If the snow is very deep, you might want to stomp around a bit to create a flat and even surface for your snow lantern. You then need to decide how big a lantern you want to build. The bigger the lantern, the more snowballs you will need.
The Foundation

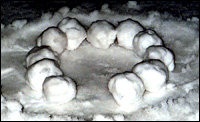
Place the snowballs close together in a circle on the ground. The bigger the circle, the bigger the lantern. Make sure that the snowballs are placed firmly onto the ground so that they don't roll away when you place more snowballs on top of them. In the example shown in the picture, 12 snowballs were used for the first layer.
Now, take away one snowball from the circle to create an opening for the candle that you will be inserting later.
The Walls

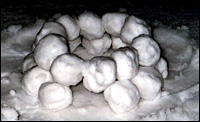
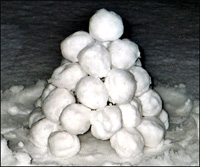
Build a second row of snowballs on top of the first row, making the second circle a little bit smaller than the first one. This is where the 'stickiness' of the snow comes in handy, because it will prevent the second circle from collapsing inwards while you are building it. If the snow isn't sticky enough, support the snowballs with one hand while adding more snowballs with the other hand.
If you want to make a really high snow lantern, make the second circle as big as the first one, and the next one, and the next one. When you feel that the lantern is high enough you start making the circles smaller.

If you have decided to make a very small snow lantern, you might want to leave a hole at the top of the snow lantern. If the flame from the candle inside the lantern is too close to the snowballs, the snowballs will start melting and drip water onto the candle, putting it out.
The Grand Finale

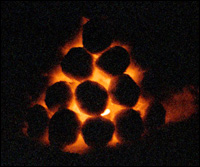
Light the tea candle and push it in through the opening in the first row, placing the candle exactly in the middle of the snow lantern.
Pull off your wet mittens/gloves and put on your nice dry warm ones.
Take a step or two back, and enjoy the warm and welcoming light from your very own snow lantern!
But What if the Snow isn't Sticky Enough?
If the snow is still sticky enough to form snowballs, you can add some stickiness by spraying them with water. Rubber gloves are recommended if using this method.
But What if the Snow isn't Sticky at All?
Make a cave snow lantern
The other possible way is to make a cave snow lantern. If there is a lot of snow and especially if you have shovelled paths in it, you’ll have the best place for a good cave lantern.
Let's say the pile of snow has a front side and a backside. You can just make a hole in the front side and burn your candle there, or – which looks much better – you can make a cave into the pile from the back side (just as small as you can, in order to get your hand and the candle through it).
The cave should not be open from the front side - leave a thin layer of snow on that side, approximately two-three centimetres/one inch. In cave lanterns it’s recommendable to use the candles with a cover, like the ones often used in graveyards – in plastic jar with a metal cover.
Break the Snow into Pieces
The third way to make a cold weather snow lantern works the best if the cold hits suddenly and the temperature falls fast. Then there will be a frozen crust on the soft snow. You can cut or break the cover into pieces with your hands and build a lantern in the shape you like the best. Those lanterns tend to be very fragile though and it’s important not to build those on the cover of the snow as the candle melts through it quite fast.
But What if it's Just Cold, With No Snow?
Make an Ice Lantern
If the weather is really cold it’s also great to make ice lanterns. For that you’ll need two buckets, one much smaller than the other.
Fill the buckets with water and place the smaller one into the bigger. Make sure that it doesn’t reach the bottom. Leave the buckets outdoor (or put them in the freezer) and wait for the water to become ice.
When all the water is frozen, then you have to get the smaller bucket out and turn the bigger bucket over to get the ice barrel. If the ice doesn’t want to get out of the bucket you can warm it up a bit, indoors or in the water.
You will now have a hollow barrel of ice. Turn it upside-down and make a hole through the top. Place it on the ground, with a lit candle inside.

