
Slow-cooked Roast Wing Rib of Beef
Created | Updated Apr 3, 2009
If you're planning a particularly special Sunday roast, this recipe will make an outstanding centre piece for the dinner table. It's based on a 'BBC Food' recipe by Heston Blumenthal. It may not be the cheapest dish per head, but as an occasional treat it's unbeatable.
The long and short of this recipe is simply to slow roast a joint of meat at 55°C (130°F) for around 20 hours. The joint is rubbed down with salt and pepper for a little spice, but the recipe is kept simple to allow the flavour of the meat to take centre stage.
Ingredients
- One 2-bone wing rib of beef
- Groundnut oil
- Freshly cracked black pepper
- Salt
Equipment
An oven thermometer capable of measuring down to 55°C (130°F). Note that some oven thermometers only go down to 100°C (210°F) so make sure it's able to read 55°C (130°F) if you're buying a new one.
A brulée torch/culinary blowtorch. If buying a new one, check which fuel it uses and make sure it comes with a supply, or purchase a refill separately. The pressurised butane gas used by some cigarette lighters can usually be used and this is available at newsagents or hardware stores.
Buying
The wing rib of beef is cut from the spine-end of the last three ribs at the rear of the ribcage and is the front-most sirloin cut (see the area labelled '10' in this diagram of beef cuts). When buying the meat, you will be purchasing a one, two or three bone joint, rather than buying by weight. Expect to pay between £20 and £30 (at the time of writing, May 2008) for a good two-bone piece of wing rib, which will feed about four to six people.
The wing rib is an uncommon sight in supermarkets, so a trip to the local butcher's shop may be required. Visit a few days beforehand to give the butcher time to order the joint in, as they may not carry stock. This will also give you an opportunity to ask questions about some of the finer details of what you are buying and allow you to shop around for the best quality meat. Two points to ask about are aging and breed, discussed below.
Aging (also known as 'curing' or 'hanging') is a process whereby the meat is hung in a precisely controlled environment to allow enzymes in the meat to break down the tough collagen and muscle fibres, resulting in a more tender raw product. A small amount of water loss during the process also concentrates the flavour, and the resulting joint will be a dark reddish-maroon colour.
The meat should have been aged for around 20-30 days when you buy it, with a minimum of 11 days being necessary to obtain any noticeable benefit from the aging process. Note that aging is an expensive process, so the resulting meat will cost more than an unaged piece of beef. The cooked result, however, will be more tender and give a richer flavour that is worth the additional cost if your budget allows it.
If you are offered a bright red joint, avoid it since it will not have been hung for very long, or will have been dyed with a harmless red colouring sometimes used for visual effect, making it difficult to determine whether it has been properly aged or not. A well-aged joint will also look a little dry and/or wrinkled as a result of water-loss during the process.
The meat should ideally come from beef cattle (as opposed to dairy cattle) to ensure the highest quality. Dairy cattle are bred for the maximum output of milk, whereas beef cattle are bred for the quality of the meat they yield. To complicate matters, dairy cattle are also used to produce beef, but the meat isn't as high a quality as that from beef cattle.
One simple way to ensure you are getting a joint from beef cattle is to ask for meat sourced from Aberdeen Angus cattle. This is a popular breed originating from Scotland and should be readily available from any butcher.
When collecting the meat, ask the butcher to part-bone the joint and string it, to save you the effort. Boning requires a large sharp knife and a hacksaw so this is best left to the professionals! Stringing is just simply tying the joint into a more rounded form to fit more easily into a roasting tin.
Image 1: A part-boned and strung wing rib
Preparing
The actual preparation process is relatively simple.
Lightly coat the entire joint with ground nut oil. Ground nut oil is obtained from peanuts and is preferable to other oils such as olive or sunflower since it reaches a higher temperature before it begins to smoke, and it also imparts less flavour into food than other oils do. Peanut allergy sufferers may be able to use ground nut oil since the extraction process can sometimes remove the proteins that cause the allergy depending on the process used, but seek proper medical advice before use.
Rub the joint down generously with freshly cracked black pepper and salt. The pepper should be reasonably chunky - similar to the covering on peppered ham from a deli. Use freshly cracked whole peppercorns if possible as these have a much stronger flavour and aroma. Either crush the peppercorns using a pestle and mortar, or use a pepper mill that grinds it on demand.
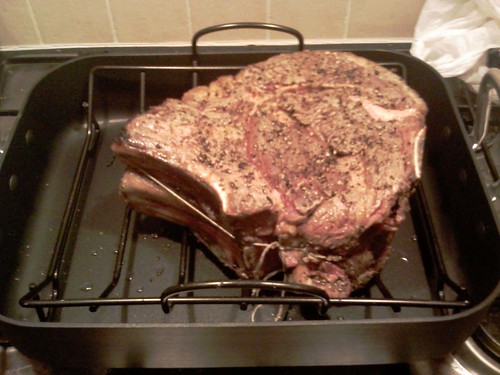
Lightly brown the surface of the meat with a brulée torch. Because of the low cooking temperature, the normal chemical reaction which turns the meat brown won't happen so this should be done before cooking the joint. This is a purely aesthetic step, and doesn't need to be an exhaustive process since a small amount of browning will still occur. If a brulée torch isn't available, the joint can be seared in a large pan with a little more oil in it. A heavy-based pan should be used to ensure the heat from the hob distributes evenly and doesn't brown one part of the joint more than another. Allow the pan and oil to heat first before placing the meat in briefly, then remove and repeat for the other side. As with the brulée torch method, avoid overcooking the surface at this point since it will brown a little during cooking.
Image 2: Meat after preparation
Cooking
To cook the joint, preheat the oven to 55°C (130°F), using the oven thermometer to ensure the correct temperature even if the oven controls have temperatures on them, and then place it on a rack in a roasting tin. Put the tin in the oven and leave it there for 20 hours, optionally rotating it by a half-turn a few times during cooking to counter any uneven heat spots your oven may have.
The low temperature will mean that the juices will stay in the meat rather than cook out and this will make for a very tender and moist result.
Remove the meat from the oven 30-45 minutes before serving and wrap in tin foil. This will allow the juices in the meat to re-congeal and prevent them from running out when you carve the joint. It will also free up the oven to be turned to a higher temperature for roast potatoes and Yorkshire puddings.
Carving
To carve the meat, first cut the bones away and then cut slices across the grain. The carving knife will do the hard work of breaking the muscle fibres and the result is that the teeth will have less work to do when eating it.
The carved meat will be pinkish in colour when done, again due to the low cooking temperature.